Bypassing the Samsung Google Account Verification (FRP Lock) will be possible in 2024.
The how to bypass google account verification after reset samsung is a problem that many users have experienced. This article will help you through the process of bypassing the Google Account Verification (FRP Lock) on your Samsung device.
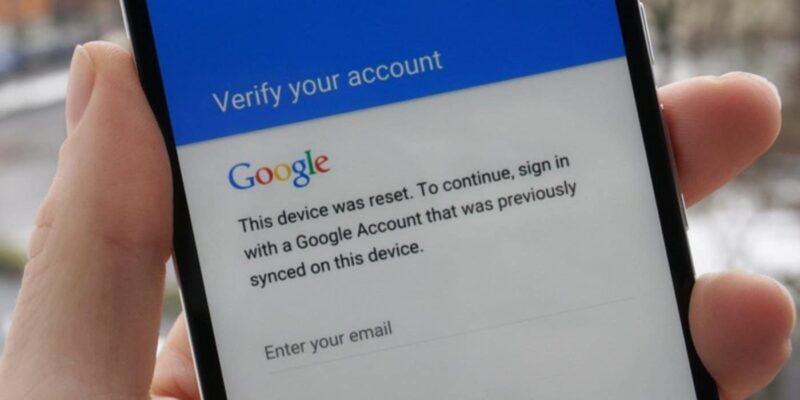
Bypass Google Account Verification on Samsung (FRP Lock) In the year 2024, What exactly is FRP? FRP stands for Factory Reset Protection, and it’s an Android security feature that prompts users to verify their Google account (email and password) soon after performing a factory reset. Firmware / ROM flashing / reinstalling
How to Get Around Samsung’s Account Verification (FRP Lock)
How to Bypass Google Account Verification (FRP Lock) on Samsung Phones in 2024
As we all know, the level of security included in Android Lollipop version 5.0.1 to Marshmallow version 6.0.1 was better than the previous version. The security of Factory Reset Protection, or FRP, is one of them.

Continue reading:
What exactly is FRP? The Android device will ask for verification of the Google account (email and password) shortly after completing the factory reset, Flash / Reinstall ROM / Firmware. FRP stands for ” Factory Reset Protection ” and functions as an Android protection system in which the Android device will ask for verification of the Google account (email and password) shortly after completing the factory reset, Flash / Reinstall ROM / Firmware.
The verification account that has to be re-entered isn’t just any account; it’s the account that the prior android/account device last recognized.
If you don’t remember it, or if it isn’t handled correctly, you won’t be able to access the device again.
This feature is similar to iOS’s iCloud security mechanism in that if someone forgets or is unable to access the account used on the device, the phone will not be able to be used.
As a result, before doing a Factory Reset, double-check that you have access to the Google account associated with the phone.
However, if you’ve previously done this and have forgotten your email or password, there are three ways to get around the Google account verification process.
The first way is to use an OTG (On-the-Go) cable, the second method is to use Sidesync, and the third method is to use ODIN (Without OTG Cable or Sidesync).
The first, second, and third ways all operate in much the same manner, namely, deleting previous accounts from the smartphone.
These three techniques need the use of a computer as well as some additional equipment and software. You must prepare the OTG cable in particular for the OTG Cable technique.
“What is an OTG cable?” you may be asking. On-The-Go (OTG) refers to a cable that may be used to connect devices like flash drives to Android phones.
In other words, the OTG has a USB connector on one end and a port for connecting to an Android phone on the other.
To go back to the heart of the issue, in this article, I’ll show you how to bypass Google Account Verification using an OTG Cable and how to bypass Google Account Verification using SideSync. In terms of the technique that does not need the use of an OTG cable,
The method outlined above is straightforward and simple to implement. Oh, and the post also includes a video lesson that may be of great use to you.
However, if you wish to attempt a different approach, there are two options.
DISCLAIMER!!!
If you’re having trouble with FRP Lock because you forgot your old account login and password, I recommend taking it to your city’s closest service facility.
Remember that androlite.com is not liable for any harm to your device that may come as a result of using the information on this site. Do So at Your Own Peril (DWYOR).
1. Using an OTG Cable to Get Around Google Account Verification
Step # 1: Gather the necessary ingredients:
- Copying programs to a USB Flashdisk on a computer
- OTG cable
- Flashdisk
- (* Required) Wi-Fi / Hotspot Network
- Download the Samsung Google Account Bypass Lock.apk program and save it to a USB flash drive.
Step # 2: Turn on the smartphone, then click ” Next ” till the WiFi network connection stage appears. Please join the accessible wireless network. Because the next button will not be recorded if there is no internet connection.
Step # 3: After connecting, click “next” until you reach the “Verify your account” or “Verifying your account” stage. Please attach the OTG connection to the smartphone at this point, where a Flashdisk holding the Bypass program for any Google account.apk is located at the end of the USB port.
VERY IMPORTANT!!!
If the smartphone does not recognize a flash disk, please replace it with a different one since there are many kinds of flash disks and telephones that are incompatible.
Step # 4: A new window will show on the smartphone screen after the OTG connection is connected. Then, on the flash drive, search for the Bypass program.
Step # 5: Download and install the bypass software. If the ” Install Blocked ” dialog box displays, touch ” Settings ” (see picture below), then scroll down to ” Unknown sources ” and check or enable it. Select ” Install ” after that.
 Step # 6: Once the installation is complete, hit ” Open ” to resume the procedure. You will be sent to the ” Settings ” menu automatically. Go to ” Backup and reset » to Factory data reset » Reset device » Erase everything » in this area. Your smartphone will resume on its own.
Step # 7: Wait for the restart procedure to finish. Remove the OTG cord from the smartphone while you wait.
Step # 8: After the phone has rebooted, you will be prompted to activate it, but there will be no Google Account Verification request. Then, till the end, follow the directions.

2. Sidesync Method to Get Around Google Account Verification
The side sync technique is almost identical to the OTG cable approach; the only difference is that while you are in the Google account verification mode, the phone must be connected to a PC / Laptop computer in order to sync with the Sidesync program.
Step # 1: Download and install the SideSync software on your computer (PC or Laptop), then start it. Please visit this website to get it: http://www.samsung.com/us/sidesync/.
Step # 2: Turn on the smartphone and follow the on-screen directions to “join to the Wi-Fi network.” To connect to the internet network in this stage, you must first connect to wifi. Because the next command will not be recorded to continue the following stage if there is no internet connection. Once connected, repeat the steps until you reach the account verification stage.
Connect your phone to your computer in step #3. A pop-up window will display on the phone screen as soon as you are connected. then choose ” Chrome “. (usually located in the middle between the Galaxy Apps and Internet). Continue by selecting No and clicking Accept and Continue. Thank you; you may now disconnect the connection that connects the cellphone to the PC.
Step # 4: Type the URL “https://goo.gl/VkMaLo” in the Chrome address box, then click go/enter to download the bypass program for any Samsung Google account.apk. You’ll be sent to the application page, where you may download it by clicking OK.
Step # 5: On the phone, press and hold the back/back button until the Term and Conditions screen appears. Select OK » Agree from the drop-down menu. Click Search (located in the top right corner of the phone screen), then type “ES File Explorer” and press Enter.
Step # 6. Choose “Establish Account” if you want to create a new Samsung account, or “Sign In” if you already have one. After you’ve completed the account setup or login procedure, click “Accept and Download.” Wait until the installation is complete before proceeding.
Step #7: Launch the ES File Explorer application. For any Samsung Google Account, look for the Download folder and pick the bypass program. Install the software. If an error notice appears that prevents the installation, go to ” Settings ” and turn on ” Unknown Sources “. Install after clicking OK.
Step # 8: Launch / Launch the application Find “Backup and Reset» Factory Data Reset »Reset Device» Erase Everything” on the bottom of the page. The phone will be restarted. Wait a few moments for the phone to come back on.
Step # 9: After the phone has rebooted, continue the on-screen prompts until you reach the end. You won’t need to connect your phone to a Wi-Fi network at this point, and your phone won’t ask for authentication of your Google account.
Go to Settings / Settings »Account» Add account to add your own Google account.

Use of the OTG and Sidesync Methods Recommendations
This technique may also be used with Android Lollipop and Marshmallow phones from Asus, Oppo, Sony, HTC, Xiaomi, Motorola, and Samsung. The following are the models and kinds of Samsung models:
- SM-J200F, SM-J200G, SM-J200GU, SM-J200H, SM-J320F, SM-J500F, SM-J500H, SM-J500G, SM-J500FN, SM-J700F, SM-J700H, SM-J730G Samsung Galaxy J Series
- SM-A300H, SM-A310F, SM-A500F, SM-A510FD, SM-A710FD, SM-A800F, SM-A910F Samsung Galaxy A Series
- EDGE SM-G925F, SM-G925I, SM-G925T, Samsung Galaxy S Series S3, SM-G900F, SM-G900H, SM-G900FD, SM-G920F, SM-G920I, SM-G920T
- SM-G928F, SM-G928G, SM-G928I, G928G, G928T, SM-G928A Samsung Galaxy S6 EDGE Plus
- N920C, N920G, N920I, N920T Samsung Galaxy Note 3, 4, 5 N920C, N920G, N920I, N920T
- SM-G531H, SM-G531F, SM-G530FZ Samsung Galaxy Grand Prime
- SM-G361H Samsung Galaxy Core Prime VE
Suggestions and Assistance Methods to bypass Samsung OTG and Sidesync
Make sure that the Google account you input for the first time on your smartphone is yours, and never ask someone else or the shop to enter their email. However, if you have a used mobile phone that was purchased or given to you by someone else, you may request an email/password that is stuck on your phone, or you can request that they convert their account to your Google account.
In addition, if you are unable to utilize the two ways above due to an issue caused by Android Marshmallow 6.0.1 or above, I suggest first downgrading to Android Lollipop. The aim is to make it simpler for pals to use your phone instead of yours. Because the two techniques listed above have been verified to work with Android Lollipop.
Continue reading:
Conclusion:
So there you have it, friends. That’s how you can get around Samsung’s Google account verification (FRP Lock), If you have any questions, please ask them in the comments section.
Don’t forget to bookmark and return to.com every day because you’ll discover the most up-to-date Technology information here, including How-to Guide Tips & Tricks. Blogging, digital marketing, Android rooting, social media games, and so on. Best wishes.
The bypass frp without google keyboard is a process that allows users to bypass the Samsung Google Account Verification (FRP Lock) 2024.

 How to Get Around Samsung’s Account Verification (FRP Lock)
